How do I use the work view?
The Work view serves as your handy assistant throughout the day. All your scheduled jobs are neatly organised and ready for you to complete, with the next job appearing automatically as you finish each one.
To access the Work view, tap Work view next to Next up from the dashboard.

Navigating the Work view


- By default, no filter is applied and all scheduled jobs are displayed. Click to apply a filter and hide completed jobs, view unassigned jobs, or jobs by user or round.

- A blue filter icon indicates a filter has been applied.

- By default, today is selected. Use the left and right arrows to navigate to past or future days.

- Click on the menu icon in the top-right corner to view scheduled work for a different day, manually
Reorderyour scheduled jobs, automaticallyOptimisethe order of scheduled jobs,View routefor the entire day in Google Maps,Hide/Show mapat the top of the page,Hide/Show route line(if the map is displayed), or adjust your Work viewPreferences.
Job details and menu
Tap on a job to view all the details you need on the go: customer/job tags, the address, weather forecast, scheduled time, duration, job cost, any customer notes or job notes, and customer balance. You can also tap Directions to start navigating to the job address in your preferred maps app or Mark as done when the job is complete.
By default, clicking Directions will start navigation in Google Maps. To change which app opens when you click Directions, see How do I change my default navigation app?
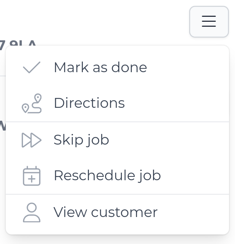
Click the menu icon to the right-hand side of a job to access the following options:
Mark as doneto generate an invoice and take payment if the customer has added an automatic payment method. You can also add a purchase order reference, upload attachments, add an external payment, or make a one-time invoice adjustmentDirectionsto start navigating to the job address in your preferred maps appSkip jobuntil it's next due. If you're skipping it at the customer's request, you can record this and we'll show how often this happens in the Jobs tab on the customer pageReschedule jobmanually for another day and timeView customerto go to the customer page where you can view their past invoices, any other jobs linked to them, and send them a message
Did you know you can update multiple jobs at the same time from the Jobs page?
Adding jobs to the Work view
Adding jobs to the Work view is simple - just schedule them for the desired day. For optimal efficiency, we recommend using the Calendar view to automatically schedule your work. You can also group jobs into rounds and schedule those for the day.
If you schedule jobs using a combination of automatic planning, rounds, and individual jobs, the order in which they appear in the Work view may not be optimal.
To solve that problem and ensure your team has the most efficient route that day, click on the menu icon in the top-right corner of the Work view and select Optimise.
You might also see an option to use a Similar work order when viewing jobs similar to work you've optimised before. This lets you reuse your past order of work - whether they were manually arranged or automatically optimised.