How do I change automatic customer notifications?
getSoapy can send automatic SMS and email messages to your customers to keep them updated about their quote, job, or to remind them to pay an invoice.
When you first start using getsoapy, all customer notifications are turned off to prevent unwanted messages from being sent while you set things up. The following notification options are available:
- Configure which notifications are sent to all customers
- Customise notifications for an individual customer
- Control when notifications are sent
Configure which notifications are sent to all customers
To select which notifications you want to enable for all customers, follow the steps below:
Go to
More>Customers>Notifications.Under the Customers and Quotes tabs, use the drop-down menu at the top to select how you want all notifications to be sent. Alternatively, you can make individual selections under each notification type (or select
Don't sendto turn that notification type off for all customers). Remember to clickSaveat the bottom of each tab when you're done.
Email notifications are free, but SMS notifications use credits.
- Don't send
- No notification will be sent
- Send by Email only
- The notification will be sent by email if the customer has an email address.
- Send by SMS only
- The notification will be sent by SMS if the customer has a phone number.
- Send by Email if available, or SMS if not
- The notification will be sent by email if the customer has an email address, but if not, it will be sent by SMS. It will not be sent by SMS if the customer has an email address.
- Send by SMS if available, or Email if not
- The notification will be sent by SMS if the customer has a phone number, but if not, it will be sent by email. It will not be sent by email if a phone number is available.
- Send by Email and SMS
- The notification will be sent by both email and SMS if the customer has an email address and a phone number.
- Click
Saveto save your preferences.
You can also customise the message template used for each notification. See How do I customise message templates?
Customise notifications for an individual customer
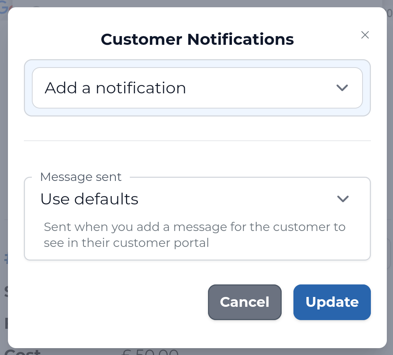
If you need to configure custom notification settings (exceptions) for an individual customer, follow the steps below:
Select the customer from
Manage>Customersor clickView customerfrom the Jobs menu.Click the menu icon in the top-right corner and select
Notifications.Any existing custom notification settings will be displayed. From here you can add a new or edit an existing custom notification setting.
Add a new custom notification setting
To add a new custom setting, select a notification type from the drop-down list.
Under the notification type, select a custom setting from the drop-down list. See above for an explanation of how each of these settings works.

- Click
Updateto save.
Edit a custom notification setting
- Under the notification type, change the custom setting from the drop-down list. See above for an explanation of how each of these settings works.
If the custom notification is no longer required, select Use defaults to remove the custom settings. The settings selected for all customers will apply to this customer for the selected notification type.

- Click
Updateto save.
Notification options
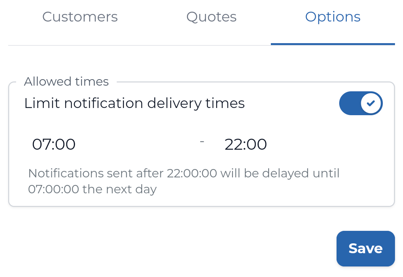
From the Options tab, you can control when notifications are sent - immediately, or only between certain hours.
Go to
More>Customers>Notifications.Select the Options tab.
Toggle
Limit notification delivery timesto only send notifications between certain times. By default, the "Allowed times" are 7:00-22:00. Tap a time to adjust it. Toggle the option off to send notifications immediately.

- Click
Saveto save your preferences.

