How do I add my business documents?
Need a place to store your documents for customers to access? We've got you covered!
Go to More > My Business > Documents to:
- upload documents like insurances or certifications
- use AI to create documents from a template like terms of service or privacy policy
- create your own documents from scratch using our document editor
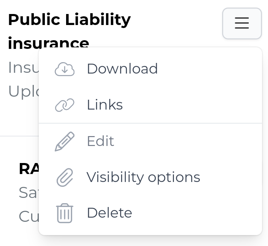
- manage documents you've uploaded. Download a copy, share a link, edit, set visibility options, or delete
Upload a document
Select the Upload option to upload an existing document from your device.
Go to
More>My Business>Documents.Click the
+icon in the top-right corner or clickAdd Document.

- In the
Add Documentform:
- select
Upload - select a
Categoryfor your document - give your document a
Title. This is the file name that customers will see so avoid using the classic "Document1"! - we'll provide a suggested
Keybased on theTitleyou enter above that can be used as a merge tag (see What are merge tags?). Feel free to edit it - tap on the
Uploadicon and select the document from your device
![]()
- All set? Click
Add Document.
Do you want customers to be able to see this document? See Share settings.
Create a document from a template
Select the Template option to use AI to create terms of service or privacy policy.
Go to
More>My Business>Documents.Click the
+icon in the top-right corner or clickAdd Document.

- In the
Add Documentform:
- select
Template - select a
Templatefrom the options provided - we'll enter a suggested
TitleandKey. Feel free to edit them before we move on - toggle the
Disclaimerand clickAdd Document
We'll guide you through all the things this document should have. Tap on each section and select or edit the details as required. When you're ready, click
Update.Give AI a moment or two to generate your document. You'll then be able to view it in our document editor, make any final adjustments to the document and formatting and click
Save.
Do you want customers to be able to see this document? See Share settings.
Create a new document from scratch
Select the Custom option to create your own document from scratch in our document editor.
Go to
More>My Business>Documents.Click the
+icon in the top-right corner or clickAdd Document.

- In the
Add Documentform:
- select
Custom - select a
Categoryfor your document - give your document a
Title. This is the file name that customers will see so avoid using the classic "Document1"! - we'll provide a suggested
Keybased on theTitleyou enter above that can be used as a merge tag (see What are merge tags?). Feel free to edit it
Click
Add Document.Now it's time to get writing! Use our document editor to create your document.
Use the toolbar to insert images, emojis, hyperlinks, and format text.
- Happy with how it looks? Click
Saveat the bottom of the screen.
Do you want customers to be able to see this document? See Share settings.
Manage documents
To view and manage the documents you've uploaded or created in getSoapy:
Go to
More>My Business>Documents.Click the menu icon to the right-hand side of the document to access the following options:
Downloada copy of the document to your device- Click
Linksto share a link to the document Editthe documentShare settings(see Share settings)Deletethe document
If you need to make changes to a document you created from a template, select Edit and then use the Recreate button to get some help from AI.

Share settings
Use Share settings if you want customers to be able to view this document.
Go to
More>My Business>Documents.Click the menu icon to the right-hand side of the document and select
Share settings.From here you can:
Share with servicesto automatically include a link to this document at the bottom of Invoices, Quotes, and Itemisations (this is the 'Linked Documents' section in Document templates) for all or selected services- toggle
Share on websiteto display this document on your getSoapy website or in the documents widget on your own website, and in the getSoapy customer portal
- Click
Save.

