How do I use the calendar view?
To access the Calendar view, go to Tools > Plan > Calendar. You'll mostly use the Calendar view to automatically plan and schedule jobs (see How do I automatically schedule jobs?) but you'll also need to use it to review and confirm your schedule. Here are a few tips for navigating the Calendar view and its features.
The Calendar view is available on the Pro plan.
Navigating the Calendar view
When you select the Calendar, it will open on the current week, with a column for each day. Scroll up and down to view earlier or later weeks. If you scroll away from the current week, click Today to jump back to it.
Within each day, you'll see a column for each worker, and a column for unassigned jobs, along with a total of the expected job value for that worker on that day. To choose which workers are shown, or to hide unassigned jobs, use the menu in the top-right corner.
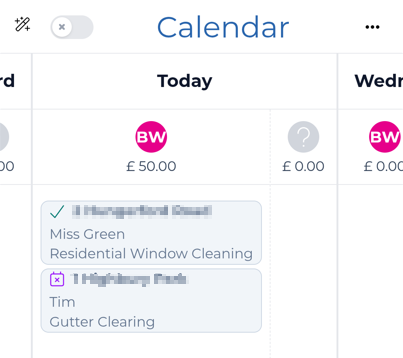
Jobs that you have confirmed will appear with a solid outline, and jobs that have been done or skipped show a tick. Jobs that you have moved or added but not confirmed will appear with a dashed outline. Only confirmed jobs will be shown in the Work view.
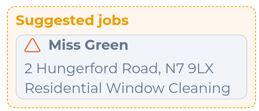
Suggested jobs appear in an orange box at the top of a worker's column. Click Add to add them to that day, then confirm them along with your other changes. You can turn suggested jobs on and off from the menu in the top-right corner of the Calendar page.
Forecasted jobs are displayed with a binoculars icon, in a box at the bottom of a worker's column. This allows you to look ahead at what your upcoming weeks might look like (beyond the next occurrence of your jobs). You can turn forecast jobs on and off from the menu in the top-right corner of the Calendar page.

Tap on a job to view more details, Reschedule or Unschedule the job, or go to the Customer page.
You can also move a job to another worker, day or week by dragging and dropping it.
To move several jobs at once, tap and hold on a job to start selecting, tap the other jobs you want to move, then click Move here in the column you want to move them to.
To add jobs to a day, click Add jobs at the bottom of a worker's column, select the jobs and click Add selected jobs.
When smart mode (the wand icon in the top-left corner) is on, the Calendar shows the smart planner's plan instead (see How do I automatically schedule jobs?).
Click the menu icon in the top-right corner to:
- view another week
- select which workers' columns are displayed (and whether unassigned jobs are shown)
Block datesto block off new dates in your calendarView blocked datesto view or delete blocked dates- toggle
Compact modeon or off.Compact modeshows less detail on each job, so more fits on the screen. - toggle the
Duration sizedoption on or off.Duration sizedhelps to show how long each job is scheduled for, but some information such as the address or service may not be displayed. - show/hide suggested jobs (
Show suggested jobs) - show/hide forecast jobs (
Show forecast jobs) - switch between the
Continuous,Multi-weekandSingle weekviews.Continuousloads more weeks as you scroll,Multi-weekhas buttons to load an earlier or later week, andSingle weekshows one week at a time Clear changes in every weekto undo any moves you haven't confirmed yet (only shown when you have some)Share data with supportto send our support team a snapshot of your calendar if something doesn't look right

Block out dates in your calendar
Use the Block Dates feature to ensure jobs aren't scheduled when you're away, when the van's in the garage, or when a job needs more than a day to complete.
Click on the menu icon in the top-right corner of the calendar page and select Block dates to block off a new date, or select View blocked dates to view or delete previously entered dates.
Dates blocked for everyone appear as a red bar below the day's heading, and dates blocked for one worker appear in red next to that worker's name. Tap on one to edit it.

Blocked dates can be applied to individual workers or to everyone. Choose who they apply to in the Applies to field.
You can also block out a day when manually scheduling a job.
Review and confirm a single day
If you've used the automatic scheduling feature, added suggested jobs, or moved or added jobs in the Calendar view, you'll need to review and confirm all the tentative jobs.
Tap on a job to view all the details you need when reviewing the tentative schedule.
When you're ready to confirm, click on the calendar icon at the top of the day's column, then click Schedule to confirm all the tentative jobs for that day and notify your customers you're coming. Toggle Limit which actions are triggered if you don't want to send a notification to the customers.

Review and confirm an entire week
To confirm all the tentative jobs for an entire week, click Schedule in the bottom-right corner. This confirms the week at the top of your screen. To undo the changes you've made to that week instead, click Clear.