How do I automatically schedule jobs?
Ready to save time and make the most of your workday?
If you're wondering how this feature works, have a read of Organising work in getSoapy.
Remember to block out any dates in your calendar before running the smart planner.
The Calendar and smart planner are available on the Pro plan.
Go to
Tools>Plan>Calendar.Scroll to the week you want to schedule, or click the menu icon in the top-right corner and select the week.

- Click
Planin the bottom-right corner. This plans the week at the top of your screen and turns on smart mode (the wand icon in the top-left corner), so you can see the planned jobs.

- In the
Plan your weekform:
- select which
Jobs to include - toggle
Spread jobsto keep all your workers busy throughout the week, or leave it to pack the work into the fewest days and workers possible - select your
Working hoursfor the week and how long you want for a break - leave the
Scheduled jobstoggle off to be able to review the plan before scheduling the jobs and notifying customers. Toggle it on to schedule the jobs straight away. - if you toggled on
Scheduled jobsyou can toggleLimit which actions are triggeredif you don't want to send a notification to the customers
Click
Plan week.Give us a minute or two, and getSoapy will confirm if any jobs couldn't be scheduled or fit into your working hours.
Review and confirm jobs
We recommend that you review your schedule one day at a time (the day before), so that you can make any necessary adjustments and be fully prepared for the next day.
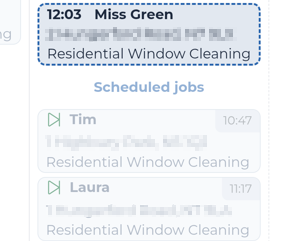
If you toggled on Scheduled jobs, you're all set! If you didn't, you'll need to manually confirm your schedule to notify your customers. Planned jobs appear with a dashed outline and their start time. Any jobs that are already scheduled (confirmed) will be greyed-out, allowing you to focus on what needs to be reviewed.
Click Schedule in the bottom-right corner to confirm all the planned jobs for the week at the top of your screen.
Or, use the calendar icon at the top of the day's column to only confirm jobs for that day.